Card Making

Fall Colors

In a few weeks I am heading to Door County, WI with my sister in law and hope to see the start of fall colors. we don’t get to see fall colors in AZ and I do miss them. However, I don’t miss what comes after!

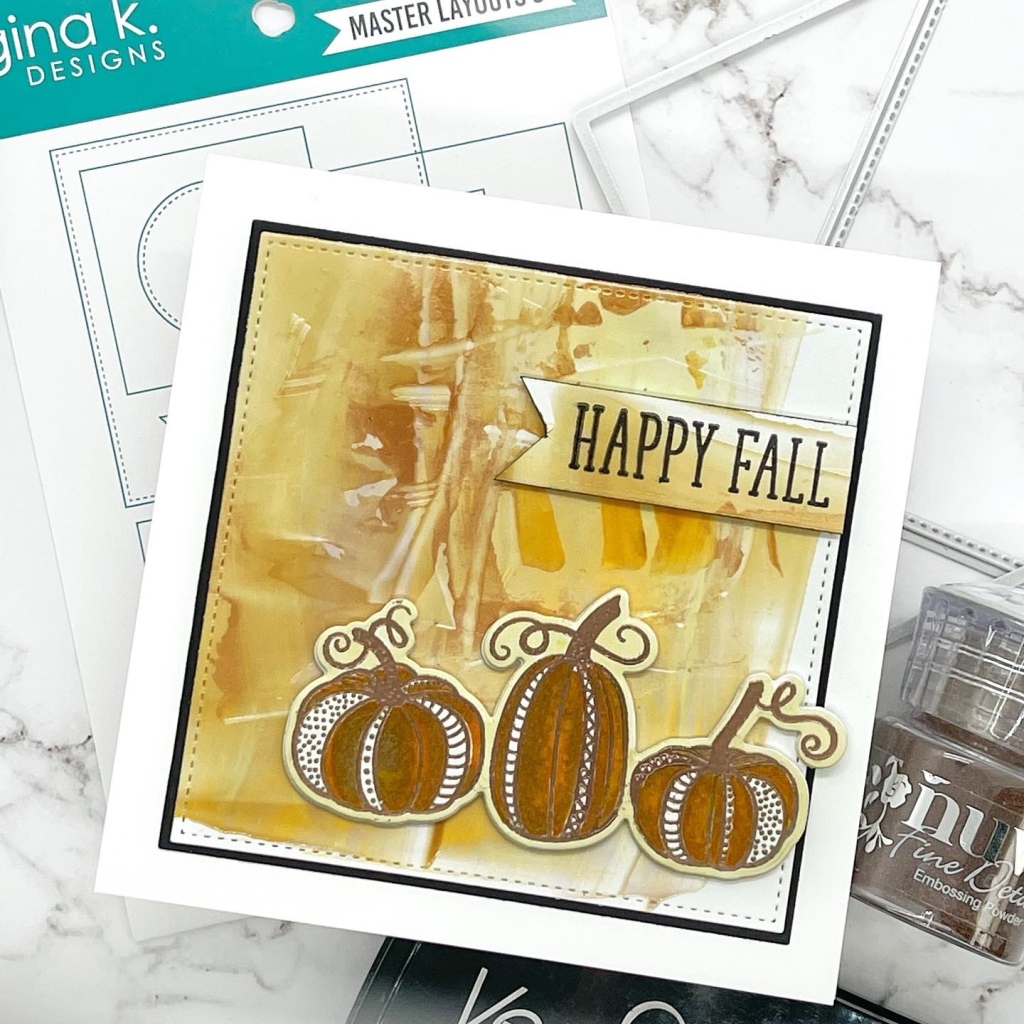
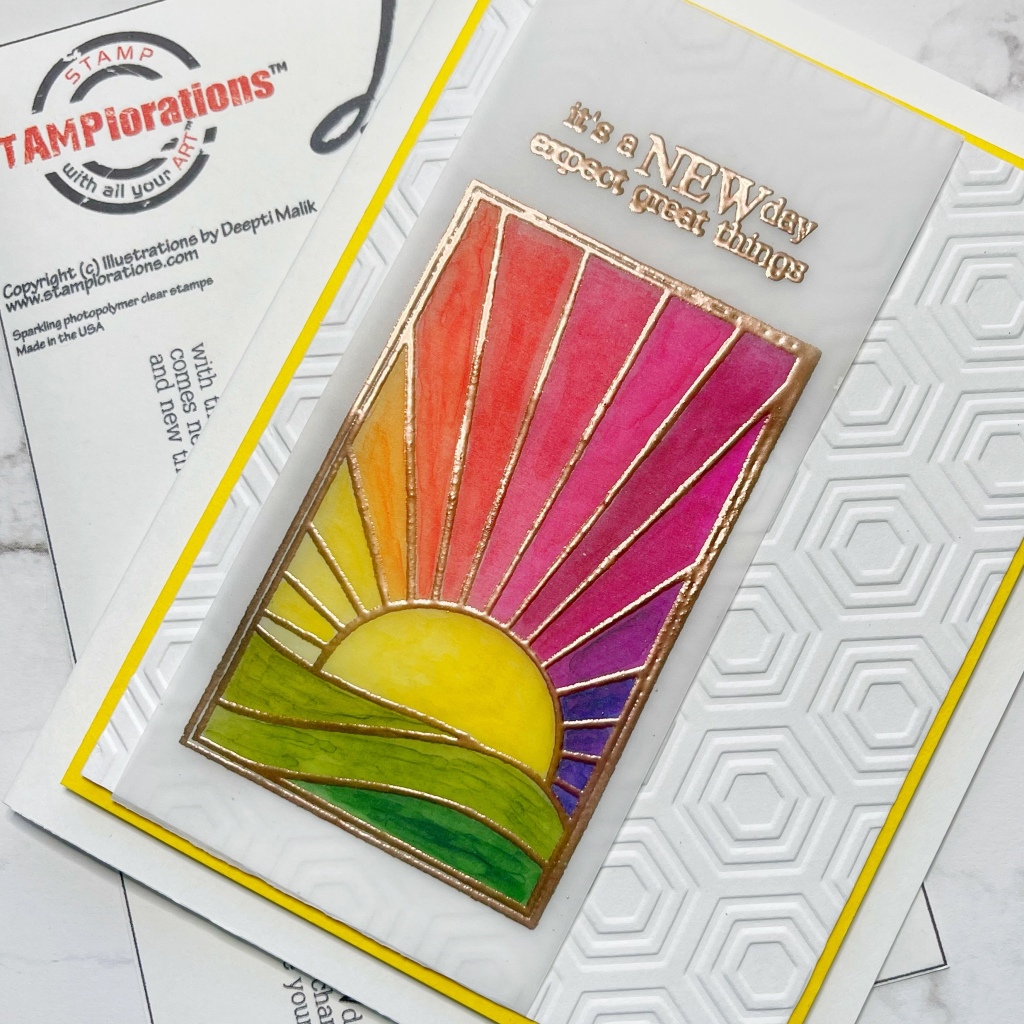
Today’s card features another background made with Nuvo Drops. It also features Gina K Designs Haunts & Harvest stamps and dies.

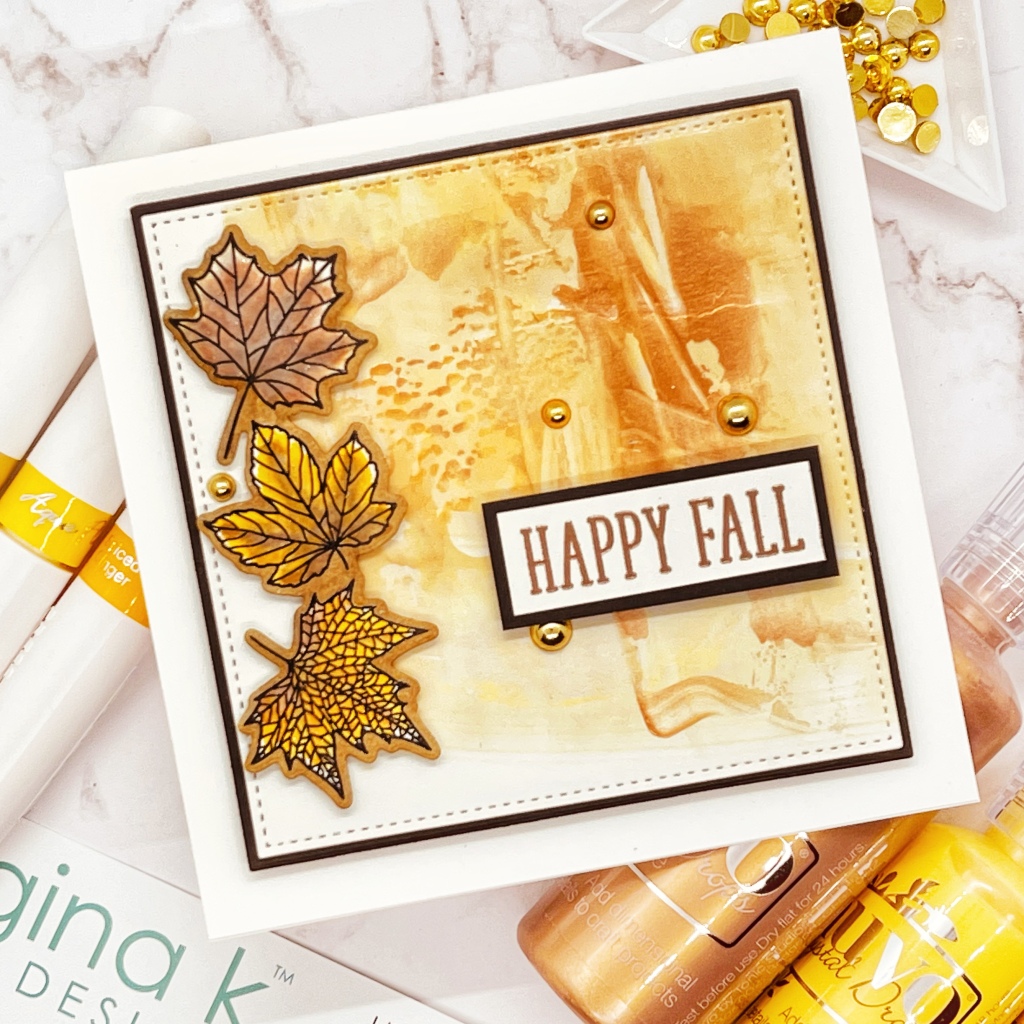
After I spread the Nuvo Drops onto card stock and let it dry. I cut it with Master Lay Outs 3.

The leaves were stamped were stamped with VersaFine Nocturne Clair and then heat embossed with clear WOW embossing powder. I use clear embossing powder with black ink because unlike black embossing powder it won’t show if you accidentally get it in a spot you don’t want. I then colored the leaves with alcohol markers.

The sentiment was stamped in Versamark Embossing Ink and covered with Nuvo Copper Blush powder and heated. The sentiment was placed in black card stock as was the card base. The leaves, sentiment and card base were popped up on foam adhesive and then attached to a white card. I adorned the card with a few gold baubles by Pinkfresh Metallic Pearls in gold

I hope you enjoy this card and that you are looking forward to fall. As always, thanks for stopping by!

Card Making

Is Summer Over?

I know there are many of you (especially up north) that want to hang on to that last ray of sunshine. But after this summer in AZ I am looking forward to a little fall weather.

This week I have been creating backgrounds using Nuvo Drops. I love the outcome. At first this one didn’t really make the cut. But I walked away for a day and when I came back to my table it was screaming for a fall sentiment!

The picture doesn’t really do it justice. There are shimmery copper streaks and the pumpkins from Gina K Design. The sentiment and stamp set are called Haunts and Harvest. The pumpkins are embossed in a beautiful Nuvo Copper Blush powder. I used the Master Layout 3 dies from GKD. These Master Layout dies hang right next to my desk as I use them on nearly every card.

I hope you enjoyed this card and that you are looking forward to fall. If you have any question or would like more details please leave me a comment. As always, thanks for stopping by!

Card Making

Halloween is Coming!

So today I am continuing with my Nuvo Drops background technique. I love finding different uses for products I have and this one is a good one!

Nuvo Drops are normally used for small embellishments but for the past couple days I have been using them for backgrounds. On this particular background I used a Gina K Designs stencil. I applied three colors of the Nuvo Drops and then with a Craft Scraper I dragged the product across a piece ofNeenah Solar White card stock.

I think the small circles look like little planets or bubbles brewing in a cauldron.

The card base was adhered to a piece of lime green card stock which I have had in my stash for a while. The stamps are part of Stampers Anonymous Snarky Halloween Cats set. They were fussy cut and glued down.

The sentiment is from the same set and popped up with pieces of scrap card. I hope you enjoy today’s card and that you have a wonderful weekend!

Card Making

I Had to Have It

You know that feeling….

A new stamp release comes out with a whole family of gnomes or a snake that you HAVE to have. Or how about that one patterned paper with the perfect red pattern that went with your daughters Christmas dress from 1994?

As a crafter we all have stuff that we had to have and we still have. Well the product I am using today I had to have (in a lot of colors). While they are beautiful products I have simply forgotten to reach for them.

I am talking about Nuvo drops. They are great for making small embellishments on cards and adding colorful shine. However, while playing today I asked myself how could I better incorporate these necessities into my cards?

I took a 3.75” x 5” piece of card stock and taped off a 1/2” to each side. I actually taped it to a clipboard. Then I took three colors and added a bit of each to a piece of cardstock. Then I used my Scrapbook.com Craft Scraper and swiped it down across the card stock. I added a bit more and swiped again.

I LOVE the outcome. I let it set completely and then added a sentiment. This sentiment was an exclusive set from Concord & 9th’s Summer Camp event. It was fabulous, full of product and fun. They will be having another event for holiday cards and registration starts August 23. I guarantee you will enjoy it. For more information go to the Concord & 9th website

Anyway back to the card. I popped the base onto an A2 card with foam tape and added a few baubles. I plan to do a few more and hope you enjoy this technique. Let me know what you think! Happy Thursday!

Card Making

Christmas in August

This past week we have seen some thunder storms in Phoenix. For me it is always nice to hear the rain and thunder. However, rarely do we get snow. As a matter of fact I can’t remember seeing snow. Growing up in the Midwest we saw more snow than any other type of weather (or at least it seemed that way)

So today is dedicated to the snowflake. Snowflakes unique design would always amaze me. Not one would ever be the same as they would land on your mitten. Individually they were delicate and gorgeous. Together the snowflakes could be powerful and destructive. The first snowfall of the year was always mesmerizing.

Today’s snowfall is from Gina K Design. It is a stencil called Snowflake Mandala. I have used Distress Oxide inks from Scrapbook.com to blend the design.

I then applied Glossy Accents to make some of the snowflake elements appear shiny. the word Merry was cut from white card stock and embossed with WOW silver embossing powder. (I think I embossed it three times)

I glued down the vellum to the front and back of the card base and then added a simple Christmas sentiment. A few silver baubles were added to the slice yet and tips of the snowflake.

Thenthe card base (4 1/16” x 5 1/8”) was popped onto Gina K Design’s In The Navy card stock (4 1/8” x 5 1/6”) and then onto a white A2 card (4 1/4 ” x 5 1/2”). I used Gina K Designs Connect glue to adhere everything.

I hope you enjoyed today’s card as much as I enjoyed making it. Please leave me any comments below if you have any questions.

Thank you and have a fabulous Wednesday!

Card Making

Crafty Hugs

Yesterday I participated in an Instagram hop for a member of our crafty community. We are all here to share inspiration with each other and new card makers. We are doing this in support of a fellow crafter, Jen. Her IG name is at kittenmoose.

When leaving comments for people it is important to remember how our words effect others. In the Thumper, “If you can’t say anything nice, don’t say nothin at all”.

This card is a reminder to be supportive of all crafters. Many of us don’t make a living sharing our inspiration and it is important to remember that when commenting. We don’t know what someone else is going through and unkind words can have a powerful impact.

Card Details

1. Gina K Designs Beautiful Butterflies 2 stamp set and dies.

2. Dress My Craft Embossing Folder from Scrapbook.com

3. Distress Oxide Speckled Egg from Scrapbook.com

4. Gina K Designs Mega Flower Stencil

5. Hero Arts Nesting Rectangle Dies from Scrapbook.com

6. Reverse Sentiments from Simon Says Stamp

7. Deco Foil Transfer Gel and Sparkle Foil from Gina K Designs

8. White card stock available from Gina K Designs

9. Grey card stock from Gina K Designs

Have a fabulous day!

Uncategorized

Craft Roulette

This post is dedicated to Mary Gunn and how much she contributes to the crafting and card making community. She has a wealth of knowledge about paper crafting and LOVES sharing it with others.

On Fridays she streams Craft Roulette. Each week she has crafters join her for a spin of the Craft Roulette Wheel. Parameters are chosen and followers have until that Sunday at midnight to create a card and post it on her site. Mary also has a FaceBook group where members share. The following week she takes the time to share all the card creations.

She also has Funn University. Different techniques are shared. During August the topic is easel cards. This show can be found on YouTube on Thursdays. I believe it airs at 6:30 pm CST.

Here are my contributions for this weeks Craft Roulette & Funn University.

Craft Roulette
Funn University

I encourage you to join in the Funn! I hope you enjoy these cards as much as I enjoyed making them. Follow Mary on Instagram @marygunn and join her FaceBook group here HERE.

Leave me a comment if you have any questions.

Card Making

Thank God It’s Friday!

I hope everyone is happy that the weekend is coming up. I have had fun this week playing with the #thedailymarker30day challenge that Kathy Racoosin organizes. Hopefully I will be able to keep up. It certainly does spark ones creativity.

So today’s card is my Day 6 of this challenge. I didn’t use that much coloring in the project but I am happy with the results.

The Snarky Cat is from Stampers Anonymous. It can be found on .Scrapbook.com Just search for Snarky Cats Halloween once you are there. It truly is one of my go to stamps and used well beyond Halloween.

I stamped the cat and masked the image. Then stamped over the cat and stamped an additional two circular objects from Catherine Pooler’s, Hey Mister stamp set using Catherine Pooler inks. The middle strip of paper was ink blended with the same inks.

I popped on a snarky sentiment, added two colors of alcohol markers to the cat and popped it up on foam tape. Voíla. Let me know what you think. Please join in the 30 Day Marker Challenge!!

Uncategorized

Tropical Flowers!!

Good afternoon!! Today I am sharing this beautiful stamp and die set. I am also featuring a cover plate that is so versatile.

This Tropical Flowers Slim Line stamp is fabulous. While it is made for slim line cards you can easily use it for all card formats!

I cut the Trellis Cover Plate and glued it over black card stock. After stamping the image I colored it using pencils. It was cut with the Tropical Flowers die.

I also cut out a circle and ink blended it with LDRS Inks. I cut it in half and placed it behind the sentiment for visual interest.

The sentiment was inked in white and embossed with white embossing powder. Doing this really helps the sentiment to pop.

I hope you enjoy the card and as always thanks for stopping by!!

Uncategorized

Fancy Floral

I just received some of the new release stamps from Gina K Design. Fresh Flower and It’s All You (this is an incentive set if you spend $75) stamp sets are easily combined.

It was an easy card to make. The card base was stenciled with a pale grey ink. I used a few of the Master Layout sets for the card base and the circle. The large flower are from the Fresh Flowers set. The small flower and sentiments from the incentive set.

Fresh Flowers designed by Melanie Muenchinger really are such a fresh and new design. I also purchased Beautiful Butterflies 2 which will be featured on my blog later this week.

They are great for all occasions. Head on over to Gina K Designs before they are gone! As always, let me know if you have questions and thanks for stopping by!

Uncategorized

Gel Print & Gina K!

I have had this gel print in my stash for some time. I just got these new Gina K stamps and dies and I think it was the perfect combo.

I will also be entering this in the Global Design Challenge

This is a mini slimline card. The gel print was cut into 1/2” strips and glued to the card. base. I then stamped the vase in Versafine Permanent Ink in Nocturne. The flower was stamped in a purple hybrid ink. I popped up the vase and flower on some foam tape. The sentiment is from a sheet of ready made saying from Simon Says Stamp.

As always thank you for stopping by!

Uncategorized

Geometric Shapes and a Stencil

So this card was fairly easy. The hardest bit was the letters but it was fun!!

I used the Simon Says Stamp Geometric Box Builder for the squares and die cut two colors of paper.

The background was a stencil from Hero Arts. I used the Double Cut Alpha dies from Concord & 9th.

The pale blue card stock is from Concord and 9th and the silver is from Gina K Designs. Thank you so much for stopping by!!

Uncategorized

It’s A Winner!

The new Distress Oxide color, Prized Ribbon, is a winner. When I first heard the new ink was in the blue family I was a bit disappointed. I am a bit of a purple girl.

Well, let me tell you this blue doesn’t disappoint!

The background was embossed withSizzix Tim Holtz Crackle 3D folder. The sentiment is a die set from Concord & 9th called All for You. I added a few gemstones and it was done. As always thanks for stopping!!!

Uncategorized

100 Day Destash-Day 31-Patterned Paper AGAIN!

Let’s face it we all have oodles of it so why not use it. Today I would like to carry on from the other days blog featuring the Concord & 9th All For You die set.

This die set covers just about every occasion I can think of so I am going to show you a few more I made today highlighting he smaller dies.

This card features the small thank die. It was created by cutting 4 words out and gluing them together. I cut the big YOU die out of 4 pieces of white (3 scraps) I glued the acetate to the first layer and then the remaining layers were glued.

I added the sequins into the letters and then glued on the patterned paper. This was put on a card base. The word thank, a heart and some sequins were popped on top. Card 1 done! The next 2 cards were done in the same fashion just changing out the word die and patterned paper and a few pieces of vellum. I hope you enjoy.

Uncategorized

100 Day Destash-Day 30-Patterned Paper

A long long time ago I spent hours in a store called Archivers sorting through patterned papers that I NEEDED! Fast forward to today and I still have most of these papers.

So today I pulled out one of my favorites and combined it with Concord & 9th All for You dies.

I die cut the word YOU from a piece of white cardstock. I added white foam tape to the back and a piece of the patterned paper after adding sequins to create a shaker element.

I them glued this to an A2 card base. I cute out the word CELEBRATE 3 times and stacked them with glue. I added this to the front and…..card done. So simple. What do you think?

Card Making

Oh Snarky Cat…..

I have to say that the Snarky Cat stamps I purchased last fall have been one of my favorites this past year. So when I was woken at 3:30am by my somewhat cat-like, Shih Tzu it was what I grabbed. Let’s say I was feeling a bit snarky…..

The background of this card was created using Simon Hurley’s Stamping Foam. This product is amazing. You heat it up with your embossing heat tool and press it into anything with texture. Then ink it up and stamp away. The best part….when you reheat it the image goes away and you can reuse it.

I pressed it into a placemat and inked it in rainbow colors. The cat was stamped separately, fussy cut and colored with alcohol markers.

I added a sentiment from Ink Road Stamps and a few Nuvo drops. Then the card stock was popped up on the base with some foam tape. The card was done, the Shih Tzu was snoring and I went back to bed! Hope you all enjoyed your weekend and slept well. Thanks for stopping by.

Uncategorized

Easy Alcohol Marker Coloring

Good Morning! If you haven’t seen any videos from Daniel West, @delandarti, or his YouTube it is definitely worth a visit. He truly breaks down coloring in easy steps.

He recently did a guest appearance on the free Card Maker’s Success Summit and it was awesome. He talks about storybook coloring with alcohol markers. If you subscribe to his blog you can also pick up a light source work sheet.

Here are a few cards I created using his techniques.

The first card I used Simon Hurley’s Stamping Foam to make the background This inexpensive card making tool really is a game changer allowing you to creat a stamp out of anything you can press it on. The foam can be found HERE.

The foam was simply heated up for 5-10 seconds with my heat tool and then pressed onto a textured placemat. The foam was inked up with Distress Oxides and stamped on to card stock.

The mouse stamp is from Colorado Craft Company and designed by Anita Jeram. It’s so cute. I colored the image with a little help from Daniel and I think it turned out pretty cute.

Make It An Ice Cream Day!

The second card is also created using the stamp foam…..the SAME stamp foam. You simply wash the foam, heat it up and the old impression disappears. The foam was heated again and I pressed it into a couple circle dies from Gina K Design’s Master Layout 3.

The foam was inked up with a Distress Oxide and stamped on a piece of card stock. I used the Zen Flower Stamps & Dies from GKD. Simply colored them and popped it up on foam squares. The base was attached to black card stock and adheres to a white card base. The HELLO sentiment came from Concord & 9th. I hope you enjoy these card and as always thanks for stopping by.

Hello
Uncategorized

A Twinchie……?

AAA Cards always have great challenges. But a “twinchie”? What the heck is that. It’s this weeks challenge and it simply means that all design elements fit in a two inch space. Everything else is white. Sound fun? Will join the challenge.

This two inch space has stenciling, a few stamps from Concord & 9th, embossing and a sentiment. Yep, I squeezed all of that in a little tiny space! I hope you enjoy it and I hope you join in the fun!

Thanks for stopping by and I appreciate your feedback!!!

Uncategorized

No Stamps Today

Sometimes I just don’t feel like getting “inky”. Okay, it’s not that oft n but it does happen. Today I am using dies from multiple Concord & 9th sets.

I just needed a quick birthday card and this did the trick. Thanks for taking a peek and I hope your day is amazing!!

Uncategorized

C9 Camp

This weekend I am attending a virtual card making camp with Concord & 9th. The counselors/instructors are an amazing group of designers and I was THRILLED to be put in Cathy Zielske’s cabin.

For those of you that love card making or scrapbooking you need to google her. She has an amazing sense of design and her YouTube channel is awesome.

Anyway, I didn’t feel like I could start using the camp supplies until camp actually starts. So I did the next best thing and bought some items from Concord & 9th during their last sale which was awesome. So for today’s card I used the Toucan Paradise Stamp & Die set. I made this card fir the Atlantic Hearts Sketch Challenge.

Hope you enjoy this card! I will keep you posted on how much fun camp is!!

Uncategorized

100 Day Destash-Day 29-Embossing Folder with a New Technique

Ok so it is the second birthday for AAA Birthday Challenge. This week’s challenge is Happy Birthday. Click HERE to participate and possibly when a prize!!

This card was with a bunch of die cut 2s, an embossing folder and a sentiment.

The embossing folder was inked with Versafine Ink on the negative side. Then sparkly Hero Arts powder was sprinkled on the embossed paper. Jennifer McGuire just did a great tutorial on this technique. Click HERE if you want to see it. The result looks much better in person. I hope you like it. Thanks for stopping by!!

Uncategorized

100 Day Destash-Day 28-Grey Ink

Let’s face it there are certain inks that we are drawn to as crafters. For me it is shades of teal and purple. So while watching a Gina K live Stamp and Chat I thought to my self “Greys?”

Well it turns out (as it always does with Gina’s cards) that grey makes for beautiful cards. My struggle with the card was that I didn’t have enough shades of grey. However, I am happy with the way it turned out.

The background was dry embossed. The flower and leaves are from A Little Love set by Gina K Designs.

I popped the flower up on some foam squares. The word love is from the same set and it is a die cut. The small sentiment was stamped, embossed and popped up on foam tape.

The card was backed with black cardstock and a white card base. Then I added a few sequins gems from the Dollar Store.

As always, thanks for visiting and I hope you are having a great weekend.

Uncategorized

100 Day Destash-Day 27-Yellow & Grey

Yellow and grey are two colors that I have to admit I don’t use frequently. So with a challenge from Gina K Design’s Facebook Page I decided to use try them. It is interesting that these two colors are the Pantone Colors of 2021. Who knew?

The background was made after watching a video from Jennifer McGuire about embossing folders. I inked the flat side of the folder with Versamark ink. Then I ran grey card stock through my die cutting machine. I used clear embossing powder. The results were awesome. The lotus is from Gina K’s Lovely Lotus stamp/die set. I embossed it with gold powder and used a yellow Nuvo watercolor pen.

The sentiment was stamped with black Versafine ink and embossed with clear powder on vellum. It was mounted on black and then white cardstock and a few Nuvo drops were added.

Thanks for stopping by and happy Friday!

Uncategorized

100 Day Destash-26 Days-Favorite Stamps

We have been busy lately with some visitors. We have been able to visit Zion National Park and also spent a day in Sedona. So card making was a bit on the back burner.

So today’s card is a simple one. It’s a one layer card with a few blingy bits. The stamp is one of Tim Holtz’s Snarky Cats. I love these cats so much! The rainbow was masked off and ink blended with Distress Oxides. Then the cat was stamped over the masked rainbow.

The spirals are from a Gina K Designs set. A few black Doodlebug gems were added. I hope you enjoy it. Have a great day!

Uncategorized

100 Day Destash-Day 24-Embossing Folders

A few weeks ago I was participating in Craft Roulette with Mary Gunn. It’s a great event that takes place every Friday evening. There is always a guest crafter and the wheel is spun four times to select color, type, theme and element for a card.

Then Mary and the guest make their cards. You can either craft along or finish your card and submit it by the following Sunday to be in a drawing for a small prize. Here is a Link if you want to join the FaceBook group and the live event.

Anyway, the element chosen was a dog. I LOVE dogs but realized I didn’t have a dog stamp. So imagine my happiness when I was gifted the Hero Arts monthly kit. So here is another card with this set. I used the set today for the TGIF Challenge. Let me know if there are any stamps your collection is missing??? Enjoy and as always thanks for stopping.

Uncategorized

100 Day Destashing-Day 23-Colored Paper & Little Silver Embellishments

I am so so so trying to use up my colored and patterned paper…it’s HARD! However, on the plus side I have not bought any new paper in 8 months so that’s great.

This card uses the Hero Arts My Monthly Hero kit. As promised, I will be using this for the next few posts. I really want to see if I can use every stamp in the set. Do you ever buy a stamp set because you want that ONE stamp?? Let me know.

This card is also made for the Freshly Made Sketch Challenge. Click here to join the fun. They always have loads of inspiration.

The inks used in this project are from Catherine Pooler. The butterflies were stamped and die cut. A few were popped up and the wings were covered with Glossy Accents. The sentiment was stamped with Versafine ink and embossed with clear powder. I used a few silver embellishments I have had for awhile. I hope you enjoy it and let me know if you have any questions.

Uncategorized

I LOVE STENCILS!!

This card was done for the Sunday Stamp Color Challenge. Please check out what the design team has done and join the fun HERE

A friend gifted me the My Monthly Hero Kit from Hero Arts for April. I am in love with it. The stencils, the dies, the stamps!!! So I used it for a few cards I will share over the next few days.

I used the Wendy Vecchi Make Art small platform while stenciling. I just bought this item in the hopes of reducing the amount of tape I use while stenciling. So far I LOVE it.

Uncategorized

100 Day Destash-Day 22-A Little Bit of Everything

This past week I took a collage class from Jennifer Chamberlain at the Maker Beehive. It was incredibly inexpensive and worth every penny. The class was called Tiny Tattered Houses.

I used old magazines, acrylics I had forever, cereal boxes, stamps. I used load of stuff. The process involved a lot of finger painting and tearing. It was a class where anything goes and I enjoyed every minute.

We made a series of tiny houses and I decided to make a series of Irish cottages with thatched roofs. I can’t wait for the next class. Thanks for stopping by!

Uncategorized

100 Day Destash Challenge-Day 22-Wreath Forms & Ribbon

You are right…..this isn’t a card. However when my mom said she wanted a little wreath for the door of their apartment I thought to myself I can do that. So staying true to my Destash Challenge I combined an old wreath form, some ribbon and twine along with a clothespin and combined it with a little sign I made and a dollar’s amount worth of sunflowers.

I hope she enjoys it. Now I have to clean up my mess so I can get back to card making 😉.

Uncategorized

100 Day Destash-Day 21-Paper Scraps

Let’s face it all of us has a drawer or folder FULL of those 1/4” pieces of paper we will use one day. Am I right? Well, today I got into that folder used up some scraps and participated in AAA Cards Clean & Simple Challenge CAS Game #187

These challenges are a lot of fun. The twist today was to use rainbow colors which I did not do because I wanted to use stuff I already had on hand. I have been hoarding these pink strip squares for some time. I also used a sentiment from Catherine Pooler which has remained unused in my stash so that’s another personal challenge. I hope you enjoy the card and as always thanks for stopping!

Uncategorized

100 Day Destash Challenge-Day 20-Stamps

Do you ever get those stamps that you just can’t figure out what to do with. I know winter is almost over in most parts of the country and figured it was about time I used the Sweater and Cocoa stamp from Gina K Designs.

So on Friday nights edition of Craft Roulette Challenge (check it out here) food was drawn as the random item we had to use in our card creation and other than birthday cake hot cocoa was all I had. So the stamp got used finally and I can check it off my list. Hope you enjoy!

Uncategorized

100 Day De-Stash Challenge-Day 19-Fusion Challenge

So today I am participating in the Fusion Challenge. I think I have created fusion between the sketch and the inspiration. Check the challenge above out and let me know what you think and play along!

During this period where I am using only the stamps and dies I have I am aware of the stamp sets that will stay in my stash and Gina K’s Beautiful Bee set is a keeper.

Combined with an old honeycomb embossing folder this card almost comes alive. Thanks fir stopping and do stop by the Fusion challenge blog. Have a great day

Uncategorized

100 Day Destash Challenge-Day 18-Mini Stamp

Organizing my craft room I found this wonderful stamp set designed by Deepti Malik and Stamplorations. I won the set from her months ago and like a lot of craft supplies I put it in a drawer and forgot about it. Well thank goodness for spring cleaning. It’s a beautiful inspirational stamp.

Deepti is a designer and she makes beautiful cards. If you are on Instagram you can find her @deesartutopia

The image was stamped on vellum and embossed. I used alcohol markers on the backside of the vellum to color the sun. It was then popped on an embossed background and layered before putting on white cardstock.

Thanks for stopping by.

Uncategorized

100 Day Destash Challenge-Day 17-Unused Stamps & Stencils

I never thought I was a paper crafter that liked the cutesy little animal stamps. My kids are grown, I have no grandkids so never really need them. However, I do card drives and other people love these cute lil creatures. So I have used this adorable little freebie I won from the Colorado Craft Company. I also managed to use a stencil that has been untouched in awhile and a few sequins.

I am determined to use my sequin stash as next year I want new embellishments. I guess I am going to have to make some shaker cards be cause I have a LOT of sequins. This card was done as part ofThe Paper Players challenge. I hope you enjoy!

Uncategorized

100 Day Destash Challenge-Day 16-Stamps I Have!

Although this is only day 16 of my personal challenge I have not purchased any new stamps since the end of December. That’s quite an accomplishment for me.

Today’s card features some Beautiful Butterflies by Gina K Designs, some ink and a few sequins. Pretty simple.

I placed the die cuts along the the edge to participate in AAA CAS Challenge. I chose the colors to participating the Sunday Stamp Challenge

This is a slimline card and I hope you like it. Happy Sunday!!

Uncategorized

100 Day Destash Challenge-Day 15-SCRAPS!!

I recently reorganized my space a bit and got my scrap pieces of paper places in plastic envelopes. I have placed the new bin right next to my die cutting machine.

My intention is to use scraps as much as possible and today it worked. This card has no stamping on it. Just an embossing folder, die cuts and a marker.

Hope you enjoy it! As always, thanks for stopping!!!

Uncategorized

100 Day Destash Challenge-Day 14-Forgotten Stamps & Sequins

One thing I have realized during this personal challenge is I do not like sequins 🙄. I think it’s the hole in the middle…it just seems like an unfinished embellishment. If you make shaker boxes they are great but I am not a shaker maker. Except for today.

Once again I was inspired by the awesome Mary Gunn and Craft Roulette Challenge. Her challenge takes place every Friday evening at 6:30pm CST on FaceBook and YouTube. Four parameters are set and away we go. Tonight’s wheel choices were:

  • 5 x 7 card base (my least favorite)
  • Colors chosen were Blue + 2 (and neutrals)
  • The element was balloon
  • Pencils had to be used somehow someway

Here’s my card I encourage you to come and join the group and join in Mary Gunn’s Funn!!!

Uncategorized

100 Day Destashing Challenge-Day 10-12 x 12 paper and ancient diecuts.

So yesterday I did a thing. Someone in a group I follow on FB mentioned they have all their pre-made sentiments saved in 4 x 6 boxes. I had one of these boxes sitting empty in my garage. So off I went. I managed to sort my sentiments and die cuts. This new storage system is already helping me. Here is a photo of the storage.

Today I was creating a card for Mary Gunn’s Craft Roulette Challenge. The parameters for this week’s challenge were the following:

  • Window Card
  • Colors- purple +2 more
  • Theme is “In the Garden”
  • Card stock has to be Kraft or tan paper

So here is my submission for the challenge. It’s a desert garden for my friend who just moved back to Dubai.

Uncategorized

100 Day Destash-Day 13-RIBBON

Alright alright I didn’t use much ribbon but give a girl a break! I am making a concerted effort to use what I have 😉. Today I am using a Gina K Designs stamp that is one of my favorites. It is so versatile.

This card started out as a Sunday Sketch Challenge but I screwed up the placement of the boxes and not sure if it will qualify…oh well. I also used my watercolor pens which I HAD to have but never use. The card background was dry embossed. The stamp, Flower Child, was embossed with black Wow embossing powder before the water color went down. I hope you enjoy it!!! I

Uncategorized

100 Day Destash Challenge-Day 11-More Patterned Paper

Good Afternoon! I hope you all are crafting away. I have been busy reorganizing my “she-shed/craft room. Doesn’t it feel great when you get things organized and clean up? I got all my 12 x 12 paper cut down to 8.5 x 11 because that is what I use. I created a storage system for scraps that works for me and got a new shelf for my room. As I was putting my cutting machines on the shelf, to create more work space I realized I don’t use them enough.

So I pulled out my Brother Scan N Cut opened up Canvas Workspace and created a big Miss U sentiment. This year I am not buying any new stamps or dies and using what I have and I am glad I did! I love the sentiment. Let me know what you think!!

The cards are 5 x 5 and I used some old patterned paper that I absolutely had to have-10 years ago 😉 I also included some pics of the pretty clean she-shed in case you wanted to see. Thanks for stopping by!!

Uncategorized

100 Day Destash Challenge-Day 9-Hey Peeps!!

In case you don’t know one of my goals this year is to use what I have. It is TOUGH not to buy new stamps or dies.

Today I really really wanted a bunny die. But I buckled down opened up my Silhouette software and created something resembling a Peep. My mom loves Peeps and I know she will love any of these cards

The products I used were the master lay outs and a stencil from Gina K Designs and Distress Oxides as well as my Silhouette Cameo 3. Enjoy!!

Uncategorized

100 Day Destash Day 8-Backgrounds and Old Stamps

Do you have those certain stamps that you will probably never get rid of? How about embossing folders? These are two of my favorites. The little bear is from a retired Stampin Up baby set and the the paisley folder is an old Cuttlebug folder.

When I saw the AAA Inchie Challenge this week I went straight to that stamp set. Although the optional twist was black and white I just had to add a pinch of pink. Hope you enjoy and if you want to join in on AAA Challenges start here.

Uncategorized

100 Day Destash-Day 7 Patterned Paper, Sequins & Die Cuts

So 100 days…..yeah. It’s a goal that I will complete. Does that mean I have to do 100 days consecutively? No, I can go at my own pace as this is my goal no one else’s.

It’s been a bit crazy lately transitioning my parents to a new apartment so the cards I have been doing have been pretty simple cards. Watching some of my favorite card makers always inspires me and today it was the awesome Jennifer McGuire.

I have used some ancient patterned paper, some acetate from packaging and a great heart die from another favorite, Gina K Designs. Some sequins were thrown in for bling. I love using scrap paper for dimension it is so much cheaper than foam tape. I used this behind the sentiment and the main card base. Thanks for stopping by!!

Uncategorized

100 Day Destash Challenge-Day 6 Die Cuts

There is nothing like a Good Friday night of crafting with Mary Gunn on Craft Roulette Challenge to get the creative juices flowing. This week’s parameters were the color orange plus 2 more, a circle, a stencil and a plant.

The stamps are from Create A Smile. The Stencil and scalloped die are from Gina K Designs Master Layout 4. Distress Oxide Inks were used on the stencil. Have a great weekend!!

Uncategorized

100 Day Challenge-Day 5 Designer Series Paper

Designer series papers were something that always caught my eye and still do. However, I seem to have purchasing restraint now. But wow there are soooo many beautiful papers out there! I don’t want to discourage you from purchasing them. The point of the challenge is to encourage you to use these supplies.

This card was made with designer paper, my own die cut and white card stock. Other than gluing the die layers together it was very simple.

Uncategorized

100 Day Challenge Day 3 & 4

Sequins and patterned paper are plentiful in my craft room. I think during the next 90 some days these two supplies will get used quite a bit.

Sequins are a supply I have tons of so I see shaker cards in the future. This card was created with a Gina K Design stencil and a Simon Hurley stamp set called Best Friends.

On Friday I have been taking part in the Craft Roulette Challenge. It is a group created by Mary Gunn on FaceBook. It starts at 6:30 pm. Check it out!!! Really gets the creative juices flowing!!! Pattern paper was destashed in this project.

Uncategorized

Craft Roulette Challenge

The last two Fridays I have taken part in a Facebook live group called Craft Roulette Challenge. It is a lot of fun. It is a Mary Gunn production and each week she features a guest crafter, many of which have quite large followings.

There are four categories which are project, colors, elements and “random”. Tonight’s project was a gatefold card. The colors were yellow, green and blue. (Neutral colors are always allowed.). This week’s element was snowman and the random selection was to use some sort of shimmer. You have 48 hours to share your project at http://www.craftroulette.live.

I thought I was done with winter cards but I suddenly remembered that I had won an adorable set of snowmen from Sweet November Stamps that I had not used yet. I think I hit all of the categories. Let me know what you think! Thanks for stopping by and join us next Friday for Craft Roulette. It starts at 6:30pm CT.

Uncategorized

Wild Thing…I Think I Love You

For some reason the background in this card reminds me of an animal print. The background was stenciled with an Elizabeth St Hilaire pattern from https://www.joggles.com/stencils/joggles-elizabeth-st-hilaire-stencils-and-masks

I used Distress Oxide in Black Soot. The hearts were cut out on my Silhouette Cameo in mirror paper and plain white card stock. The white paper was embossed with a Swiss dot folder.

I didn’t have any heart embellishments and this is one item I am not purchasing in 2021 so I made some out of my Nuvo drops (which I have PLENTY of). The LOVE die is from Gina K Designs A Little Love set. Thanks for stopping by.

Card Making

Tropical Blues

Good Morning, this is Kathy. I hope you all are well. Does anyone miss traveling? I sure do and this beautiful stamp set from LDRS reminds me of a tropical vacation.

The Tropical Floral Slimline and coordinating die are part of the LDRS summer collection. It is a big and beautiful stamp that is perfect for slimline and A2 cards. The coordinating die is also available but wasn’t used in this project.

I stamped the image on Neenah Solar White 110lb card stock in the Raven Hybrid Ink. I then used a rectangle die to cut out part of the image.

I colored the inner part of the cut out with alcohol markers and used the Raven Hybrid Ink to stamp the sentiment which is in the stamp set. I embossed it in clear embossing ink. I am sure many of you know that stamping in black ink and embossing in clear powder (instead of black) creates less of a chance of loose powder. If you do have powder in places you don’t want it’s clear!

I then glued the outer cut to a 4.25 x 5.5” card base using foam tape. This sums it up.

I hope you enjoy this card as much as I enjoy being part of the LDRS Creative team. Please let me know what you think in the comments below.